Auto Fund Add using bKash Payment
Custom Payment Gateways
Multiple Currency Support
Custom Gateway Fee
Demo User: demo@razibahsan.com
Demo Pass: bc}nB123nQ3WpKj
Our Logicbox Payment Gateway Service is temporarily closed.
Our Awesome Pricing Plans
Get started now with instant activation and a quick installation process
Monthly License
$3 / month
- bKash Instant Payment
- Multiple Custom Gateways
- Custom Gateway Fee
- Custom Currency
- Standard Support
- Host on your own server
Yearly License
$27 / year
- bKash Instant Payment
- Multiple Custom Gateways
- Custom Gateway Fee
- Custom Currency
- Standard Support
- Host on your own server
Owned License
$62.5 / life time
- bKash Instant Payment
- Multiple Custom Gateways
- Custom Gateway Fee
- Custom Currency
- Standard Support
- Host on your own server
Features & Services
Get our Logicbox Payment Gateway with awesome features and services. Automate your add fund option with this script.

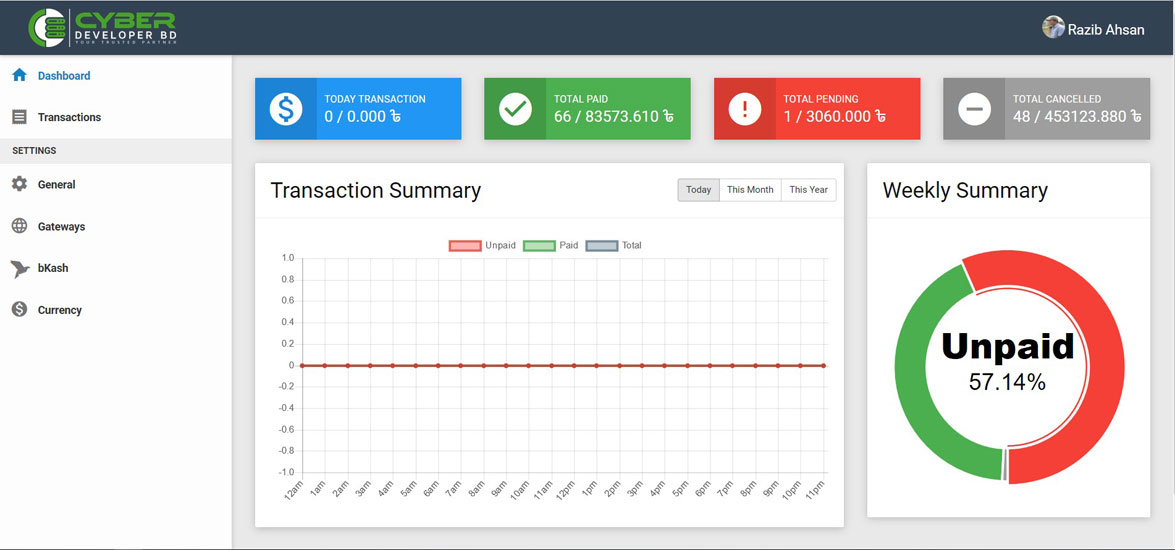
Dynamic Dashboard
You will get dynamic dashboard. Check and control all of your transactions. Setting your gateways and more.

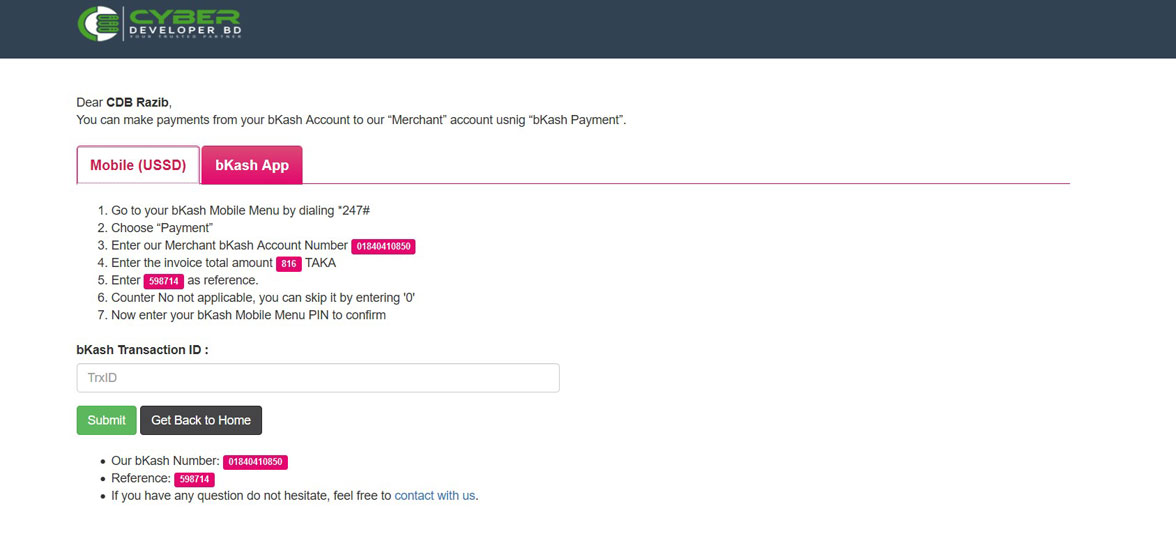
bKash Payment
Add your bKash merchant account with API’s and make your add fund system automated.

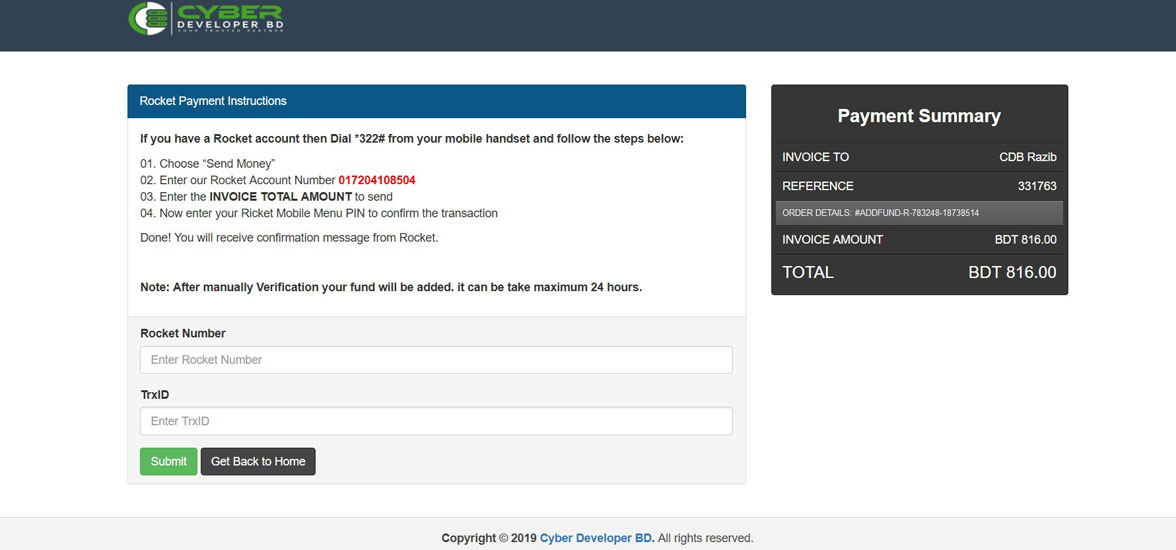
Custom Gateways
You can add multiple custom payment gateways like Rocket, Bank Deposit, bKash Sendmoney etc.

Multiple Currency
You can add multiple custom currency like BDT, USD, EURO etc and make one as a default.
Custom Gateway Fee
Don’t lose your money. You can set custom gateway fees for each of your payment gateways.
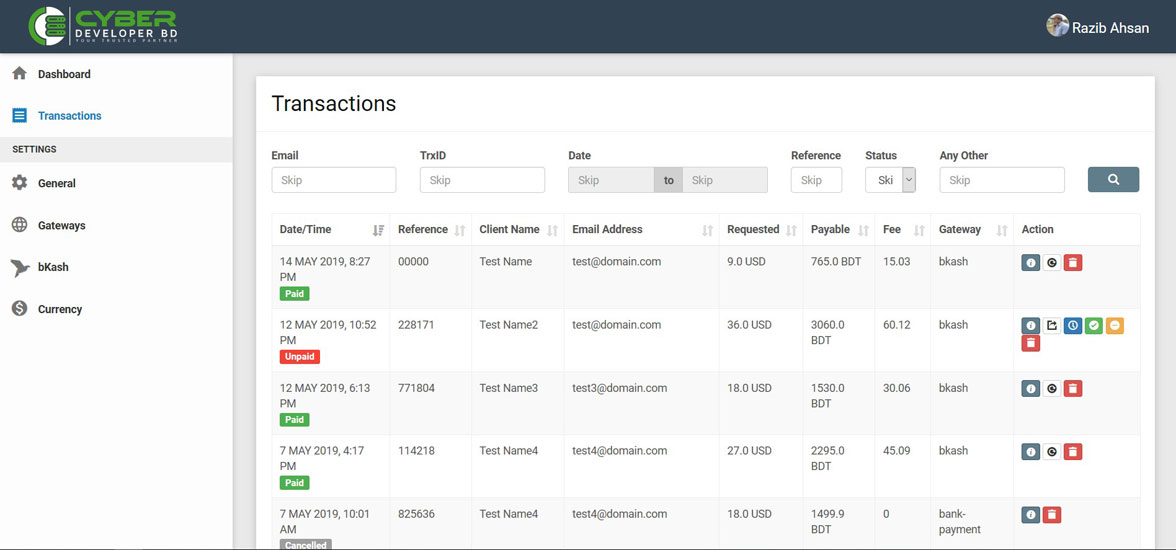
Transection List
You can check all of your transaction list and manage the add fund. You can manually accept, cancel or delete add fund order.
Software Preview and Screenshots


How to install and setup
How to install Logicbox Payment Gateway
1. Order our Logicbox payment gateway and download it from our client area download section.
2. Upload the zip file into your hosting server and unzip it.
3. Visit your script using direct link.
4. Check the script requirements. If all requirements filled by your hosting then click next.
5. Input Your License Key and Check the “I’m Agree with the Terms and Condition”. And click Next.
6. Input your database name, database user name and database password and click Next
7. Input your name or company name, email address, password and click Next
8. Your script will be installed within few second. You are done. Now go to your software login page.
How to setup Logicbox Payment Gateway
General Settings:
1. Login your Logicbox Payment Gateway software. Goto General Settings from left side menu.
2. Input your company information like your logo, company name, company website url and alert mail where you want to get mail alert for receiving any fund request.
Add Currency:
1. Login your Logicbox Payment Gateway software. Goto Currency from left side menu.
2. Click Add currency from right top corner of the page. Select Currency from Drop down list and input currency rate in BDT. Click Save
3. Make it default currency.
Add bKash Merchant Gateway:
1. Login your Logicbox Domain Reseller panel and goto Settings>Finance & Billing>Payment Gateway>List/Add.
2. You can found various payment gateways here. You have to add custom gateway. Scroll down in the bottom anf find out “Want to use another payment gateway? Add it now”. Click Add it now.
3. Fill out the information of the page:
Gateway URL: Input your gateway url. eg: https://demo.razibahsan.com/lbpgateway/payment/bkash
Gateway Name: Input your custom gateway name. eg: bKash Payment
Change other settings as you needed.
Checksum Algorithm must be MD5
4. Click Save
5. Again Goto Settings>Finance & Billing>Payment Gateway>List/Add. You can see your added custom payment gateway here. Click Manage button from left side of the gateway list.
6. Copy the Key from manage page.
7. Goto your Logicbox Payment Gateway admin panel. Click bKash from left side menu and input the key into Gateway Key input box.
8. Fillup all other information:
API Username: Your bKash API user name
API Password: Your bKash API password
Merchant Number: Your bKash merchant number
App Qr Code: If you have any QR code from bKash, upload it here.
Bkash Charge (Percentage): Add bKash charge. eg: 2
ERROR CODES: Input error code messages if you want to change default messages from bKash.
9. Click Save Changes.
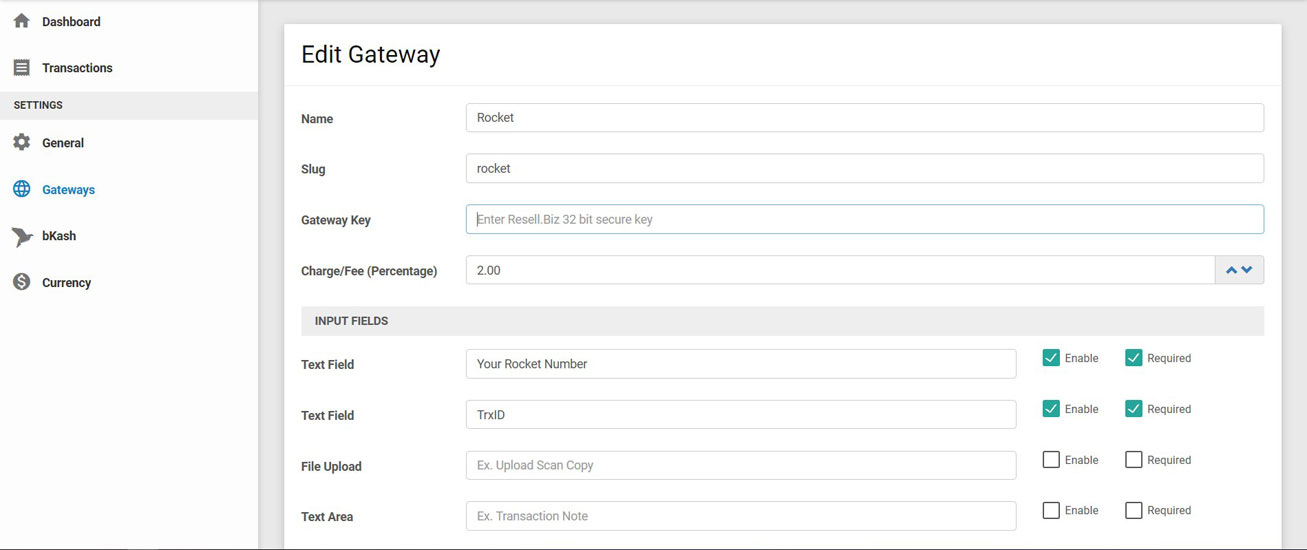
Add Custom Gateway:
1. Follow 1 to 6 steps from “Add bKash Merchant Gateway” instructions.
2. Goto your Logicbox Payment Gateway admin panel. Click Gateways from left side menu
3. Click Add Gateway from right top corner.
4. In Add Gateway page, fillup all information like bellow:
Name: Your custom gateway name. eg: Rocket
Slug: Input this custom gateway url slug. eg: rocket (You have to input this link correctly on logicbox panel)
Gateway Key: Input gateway key that you got from you domain reseller panel gateway page.
Charge/Fee (Percentage): Input gateway charge.
INPUT FIELDS: These fields for collect payment information from your customer. Enable your required text field, file upload or text area. For example Rocket Payment Gateway, you need your customer Rocket number and TrxID. You have to enable 2 text fields one for Rocket Number and other for TrxID. For Bank Deposit payment, you have to enable upload field for get deposit receipt. You can drag and drop to rearrange the Input Fields.
PAYMENT INSTRUCTION: In this field write details instructions for your customer how can they pay.
5. Click Save Changes.
Copyright © 2012-2026 Cyber Developer BD . All Rights Reserved.

